Thursday, August 31, 2017

Macros in Salesforce

What is Macro in salesforce?

If you have tasks in Microsoft Excel that you do repeatedly, you can record a macro to automate those tasks. A macro is an action or a set of actions that you can run as many times as you want. It is a set of instruction which instructs system how to complete  task.

Same way salesforce has this macro capability and this is applied for all standard and custom feed based object from Spring-16 release.

Example:
Support agents who use Case Feed now can run macros to automatically complete repetitive
tasks—such as selecting an email template, sending an email to a customer, and updating the case status—all in a single click. Sounds so cool? 

Prerequisites for using macros 

1. Feed tracking must be enabled on the object that you want to run macros on.
2. Use a feed-based page layout on the object that you want to run macros on.
3. The publisher actions that you want to use in macros must be available on the page          layout.      
4. If you want to use quick actions in macros, the quick actions must be available on the page layout
5. The macros widget must be added to the console
6. Users must have the appropriate user permissions to create macros and run macros.


Add the macros browser to the Salesforce Console

1. Navigate to Setup-->Apps-> select console app want to add macro browser 
2. Click on Edit , Add Macros Browser in choose custom console components section and set    align this to left or right

user permissions to create macros or run macros

1.  Assign appropriate permission for Macro object

2. To allow users to run irreversible macros( Macro actions that cant be undone) , assign permission “Manage Macros Users Can’t Undo.”

Allow Search in Macro


suppose that an agent wants to find a macro where the description is “ License Penalty 90 days” The agent could search for “Penalty” and see all macros that contain that phrase. If this setting isn’t enabled, agents can search for keywords only in the macro’s title and description

fields.
1. Navigate to Setup->Macros-> Macro Settings  and include macro text field search

Create Macros

1. Go to your service console  Application from app menu.
2. click on Macro on the bottom of the page and then click on "Create a Macro"
3. Enter Macro name, description and add instructions to this macro to execute. Select the context for the macro then select object that macro interacts with and then select the action that want to be performed by macro. 
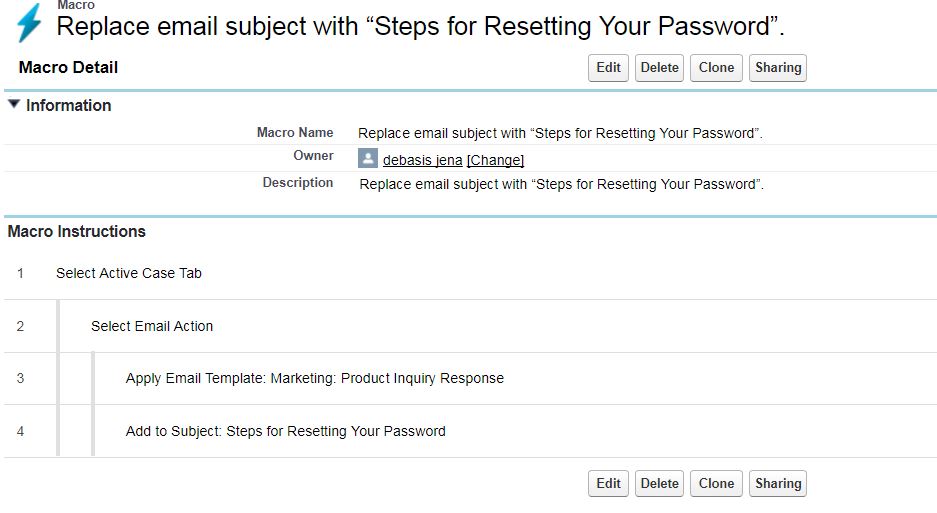
After creation of macro with few instruction it looks like 

Run a Macro


Macros automate a series of repetitive keystrokes that support agents make in the Salesforce Console for Service. You can quickly complete repetitive tasks, such as updating the case status, by running a macro.

1. Open Macro widget
2. Search for a Macro and select it from the Macro list
3. click RUN/PLAY ICON to start the Macro, a message displays indicating whether the macro ran successfully.  

Managing Macro

We can clone, delete and share macro easily.
We can quickly copy macros by cloning them 
open the macro which one u want clone by click on view details icon and then click on clone 
Macros use the same sharing model as other objects in Salesforce. You can share macros with public groups and other users, allowing other support agents to increase their  efficiency with macros. 
Open macro with click on view details button and click on sharing button and in the sharing page search for a username or public group with whom want to share the macro.


We will discuss about bulk macro and few examples in next Post. stay Tuned.

Tuesday, June 27, 2017

Summer 17 Release highlights

Sunday, December 11, 2016

Disable button from page layout used in VF page


Disable button from page layout used in VF page


you have used a standard page layout in vf page and you do not want to enable all buttons of that page layout in the VF page always. That means we need to conditionally enable or disable page layout buttons in vf page .

use below tag to display standard layout in VF page
      <apex:detail relatedList="false"></apex:detail>


we need to use javascrcipt or jquery to enable or disable the buttons based on some condition dynamically.

in below code snappet, thisLead is a getter to store the current lead record to show lead information in page.
Here I am disabling Convert button for the leads with status  "Working Converted".  First get the button with getElementByName and set the CSS attribute for the button as Oppacity = 0.65 and cursor as not-allowed.


if ("{!thisLead.Status}" == 'Working - Contacted') {
    var btns = document.getElementsByName('convert');
    for (var i = 0; i < btns.length; i++) {
        btns[i].style.opacity = 0.65;
        btns[i].style.cursor = 'not-allowed';
    }
}

Monday, August 29, 2016

Select All records in Pageblock table Visualforce page Using Javascript


Sometime we are displaying list of records in Visualforce page and need to select some or all by click on check box.
If we need to select all records from the list,we can use client side code(java script) to select all records in a single click instead of selecting each one individually or using some server side code to select all records.

Lets create a VF page where we will display all list of record with a select checkbox.

Visualforce page

<apex:page controller="SelectRecordController">
<!--Javascript to select all records-->
    <script type="text/javascript">
        function selectAllRecords(obj,selInputID){
            var inputCheckBox = document.getElementsByTagName("input");                  
            for(var i=0; i<inputCheckBox.length; i++){          
                if(inputCheckBox[i].id.indexOf(selInputID)!=-1){                                     
                    inputCheckBox[i].checked = obj.checked;
                }
            }
        }
    </script>
    <apex:form >
        <apex:pageBlock >
            <apex:pageBlockTable value="{!wrapRecordList}" var="recWrap" id="table" 
                             title="All Accounts">
                <apex:column >
                    <apex:facet name="header">
                        <apex:inputCheckbox onclick="selectAllRecords(this,'inputId')"/>
                    </apex:facet>
                    <apex:inputCheckbox value="{!recWrap.selected}" id="inputId"/>
                </apex:column>
                <apex:column value="{!recWrap.acc.Name}" />
                <apex:column value="{!recWrap.acc.BillingState}" />
                <apex:column value="{!recWrap.acc.Phone}" />
            </apex:pageBlockTable>
        </apex:pageBlock>
    </apex:form>
</apex:page>


Controller:

public class SelectRecordController {
    public List<wrapRecord> wrapRecordList {get; set;}
     
    public SelectRecordController(){
        if(wrapAccountList == null) {
            wrapRecordList = new List<wrapRecord>();
            for(Account a: [select Id, Name,BillingState, Website, Phone from Account 
                             limit 10]) {                
                wrapRecordList.add(new wrapRecord(a));
            }
        }
    }
     
    public class wrapRecord {
        public Account acc {get; set;}
        public Boolean selected {get; set;}
        
        public wrapRecord(Account a) {
            acc = a;
            selected = false;
        }
    }
}

Output:

When you open this page , all list of records will be displayed with a checkbox in column header.

If you select his check box then JavaScript function will execute and all list of records will be selected.

Monday, August 22, 2016

Create record from CSV file using Apex


Upload Data without DataLoader/Import wizard in salesforce


When there is a need to load data from CSV file to salesforce, generally we use dataloader/jitterbit/import wizard    to import data in salesforce.

while using data loader or import wizard we have to configure some steps like select the object then field mapping etc.

But if there is some requirement to load data by the end user and end user not using data laoader, then we need to develop a functionality to load data using apex and visual force.

Step 1:

Create a standard template and all data should be loaded only by using this standard template

step2:

Save this standard template in Document folder so that All users who are need of it can download.

Step3:

Develop a Vf page which will have Upload csv functionality with a button having the logic to create the record to appropriate object.


Lets explore more on this....


Lets consider I want to develop Lead upload functionality  for the end user, here users are only interested to upload the lead records with field information FirstName, LastName, leadSource, email,company,Phone.

So as per step 1 and 2 , create a CSV  with all these as the header of file as template and store in document folder.

Now develop a VF page where we will have upload lead functionality, here in this page we will have a inputfile component where we will select the csv to upload and one Upload button. On click of the button Lead records will be created in the system and in below we can see the successfully created leads and the leads which are not created in the system due to some error.


Code for VF Page

<apex:page sidebar="false" controller="FileUploader" showHeader="false">
   <apex:form >
      <apex:sectionHeader title="Upload Leads from CSV file"/>
  
      <apex:pageBlock >
             <!--  Component to allow user to upload file from local machine -->
             <center>
              <apex:inputFile value="{!contentFile}" filename="{!nameFile}" /> <apex:commandButton action="{!ReadFile}" value="Upload File" id="theButton" style="width:70px;"/>
              <br/> <br/> <font color="red"> <b>Note: Please use the standard template to upload Leads. <a href="/servlet/servlet.FileDownload?file=015O00000016XLt" target="_blank"> Click here </a> to download the template. </b> </font>
             </center> 
    
      <!-- After the user clicks the 'Upload File' button, this section displays the inserted data -->
      <apex:outputText value="leads Created" rendered="{!NOT(ISNULL(uploadedLeads))}"/>
      <apex:pageblocktable value="{!uploadedLeads}" var="lead" rendered="{!NOT(ISNULL(uploadedLeads))}">
          <apex:column headerValue="First Name">
              <apex:outputField value="{!lead.FirstName}"/>
          </apex:column>
          <apex:column headerValue="Last Name">
              <apex:outputField value="{!lead.LastName}"/>
          </apex:column>
          <apex:column headerValue="Lead Source">
              <apex:outputField value="{!lead.leadSource}"/>
          </apex:column>
          <apex:column headerValue="Email">
              <apex:outputField value="{!lead.email}"/>
          </apex:column>
          <apex:column headerValue="Company">
              <apex:outputField value="{!lead.company}"/>
          </apex:column>
        
      </apex:pageblocktable>
        <apex:outputText value="leads Not Created:Due to some error" rendered="{!NOT(ISNULL(NotuploadedLeads))}"/>
       <apex:pageblocktable value="{!NotuploadedLeads}" var="lead" rendered="{!NOT(ISNULL(NotuploadedLeads))}">
          <apex:column headerValue="First Name">
              <apex:outputField value="{!lead.FirstName}"/>
          </apex:column>
          <apex:column headerValue="Last Name">
              <apex:outputField value="{!lead.LastName}"/>
          </apex:column>
          <apex:column headerValue="Lead Source">
              <apex:outputField value="{!lead.leadSource}"/>
          </apex:column>
          <apex:column headerValue="Email">
              <apex:outputField value="{!lead.email}"/>
          </apex:column>
          <apex:column headerValue="Company">
              <apex:outputField value="{!lead.company}"/>
          </apex:column>
        
      </apex:pageblocktable>
    
      </apex:pageBlock>     
   </apex:form> 
</apex:page>


Controller for this Page

public class FileUploader
{
    public string nameFile{get;set;}
    public Blob contentFile{get;set;}
    String[] filelines = new String[]{};
    List<Lead> leadstoupload;
   // List<Lead> leadsuploaded;
    /***This function reads the CSV file and inserts records into the Lead object. ***/
    public Pagereference ReadFile()
    {
        try{
                //Convert the uploaded file which is in BLOB format into a string
                nameFile =blobToString( contentFile,'ISO-8859-1');
               
                //Now sepatate every row of the excel file
                filelines = nameFile.split('\n');
               
                //Iterate through every line and create a Account record for each row
                leadstoupload= new List<lead>();
                for (Integer i=1;i<filelines.size();i++)
                {
                    String[] inputvalues = new String[]{};
                    inputvalues = filelines[i].split(',');
                   
                    lead l = new lead();
                    l.FirstName = inputvalues[0];
                    l.LastName= inputvalues[1];      
                    l.LeadSource= inputvalues[2];
                    l.Company= inputvalues[3];
                    l.Email = inputvalues[4];
                    l.phone = inputvalues[5];
                    l.Website = inputvalues[6];
                    l.Status = 'Open - Not Contacted';
                    leadstoupload.add(l);
                }
         }
         catch(Exception e){
                 ApexPages.Message errormsg = new ApexPages.Message(ApexPages.severity.ERROR,
                               'An error has occured reading the CSV file'+e.getMessage());
                ApexPages.addMessage(errormsg);
         }      
        //Finally, insert the collected records
        try{
            Database.SaveResult[] srList = database.insert(leadstoupload,false);
           
           for (Database.SaveResult sr : srList) {
               if (!sr.isSuccess()) {
              
                   for(Database.Error err : sr.getErrors()) {
                   }

               }

           }


        }
        catch (Exception e)
        {
            ApexPages.Message errormsg = new ApexPages.Message(ApexPages.severity.ERROR, 
                        'An error has occured inserting the records'+e.getMessage());
            ApexPages.addMessage(errormsg);
        }   
        return null;
    }
  
   /**** This function sends back to the visualforce page the list of lead 
     records that were inserted ****/
    public List<lead> getuploadedLeads()
    {
        list<lead> leadscreated;
        if(leadstoupload!=null){
             leadscreated= new list<lead>();
            for(lead l : leadstoupload){
                if(l.id!=null){
                    leadscreated.add(l);
                }
            }
        }
        return leadscreated;
     
           
    } 
     public List<lead> getNotuploadedLeads()
    {
        list<lead> leadsNotcreated;
        if(leadstoupload!=null){
             leadsNotcreated= new list<lead>();
            for(lead l : leadstoupload){
                if(l.id==null){
                    leadsNotcreated.add(l);
                }
            }
        }
        return leadsNotcreated;
     
           
    } 
        /**
         This function convers the input CSV file in BLOB format into a string
        @param input    Blob data representing correct string in @inCharset encoding
        @param inCharset    encoding of the Blob data (for example 'ISO 8859-1')
     */
    public static String blobToString(Blob input, String inCharset){
        String hex = EncodingUtil.convertToHex(input);
        System.assertEquals(0, hex.length() & 1);
        final Integer bytesCount = hex.length() >> 1;
        String[] bytes = new String[bytesCount];
        for(Integer i = 0; i < bytesCount; ++i)
            bytes[i] =  hex.mid(i << 1, 2);
        return EncodingUtil.urlDecode('%' + String.join(bytes, '%'), inCharset);
    }        
}


Output:


Create CSV template in below format and add in Document folder, user can download this template and add record information and this updated template with data can  be uploaded to the system by click on Choose file and Upload file button as per the above screen shot.


once you have uploaded lead, you can get the upload result as below screen shot.

Note: I have hard coded document id in above VF page, but we can query this lead template and get the document id whihc we can use inplace of hardcoded id.


Dialog box in Visualforce page


Dialog box in VF page

If we need to show any alert to display in vf page, instead of using window.alert() which is with traditional look and feel, we can use dialog box using below script.

<apex:page >
<script type="text/javascript">
document.body.style.cursor="auto";
var box=new SimpleDialog("This is my alert", true);
box.setTitle("Please initiate call to case contact");
box.createDialog();
    box.setContentInnerHTML("<input type=\"button\" value=\"Ok\"  onclick=\"javascript:box.hide();\"/>");
box.show();
</script>
</apex:page>

Monday, August 1, 2016

Convert a number/Currency to its expression in words

Number To word Converter

Lets consider one scenario where user enters currency in currency/Number format and system need to convert that Currency/number to word format.

ex: $2345.12
Output: USD Two Thousand Three Hundreed Fourty Five and twelve cent.


Create a class NumberToWord 


public  class NumberToWord { 
    static String[] to_19 = new string[]{ 'zero', 'one',  'two', 'three', 'four',  'five', 
 'six', 'seven', 'eight', 'nine', 'ten',  'eleven', 'twelve', 'thirteen', 
     'fourteen', 'fifteen', 'sixteen', 'seventeen', 'eighteen', 'nineteen' }; 
    static String[] tens = new string[]{ 'twenty', 'thirty', 'forty', 'fifty', 'sixty', 
                               'seventy', 'eighty', 'ninety'}; 
    static String[] denom = new string[]{ '', 
     'thousand',   'million',     'billion',    'trillion',    'quadrillion', 
    'quintillion', 's!xtillion',   'septillion',  'octillion',   'nonillion', 
      'decillion',  'undecillion',   'duodecillion', 'tredecillion',  'quattuordecillion', 
      's!xdecillion', 'septendecillion', 'octodecillion', 'novemdecillion', 'vigintillion' }; 
    // convert a value < 100 to English.   
   public static String convert_nn(integer val) { 
      if (val < 20) 
        return to_19[val]; 
     if(val == 100) 
          return 'One Hundred'; 
      for (integer v = 0; v < tens.size(); v++) { 
        String dcap = tens[v]; 
        integer dval = 20 + 10 * v; 
        if (dval + 10 > val) { 
          if (Math.Mod(val,10) != 0) 
            return dcap + ' ' + to_19[Math.Mod(val,10)]; 
          return dcap; 
        }     
      } 
      return 'Should never get here, less than 100 failure'; 
    } 
    // convert a value < 1000 to english, special cased because it is the level that kicks  
    // off the < 100 special case. The rest are more general. This also allows you to 
    // get strings in the form of "forty-five hundred" if called directly. 
    public static String convert_nnn(integer val) { 
      String word = ''; 
      integer rem = val / 100; 
      integer mod = Math.mod(val,100); 
      if (rem > 0) { 
        word = to_19[rem] + ' hundred'; 
        if (mod > 0) { 
          word += ' '; 
        } 
      } 
      if (mod > 0) { 
        word += convert_nn(mod); 
      } 
      return word; 
    } 
    public static String english_number(long val) { 
      if (val < 100) { 
        return convert_nn(val.intValue()); 
      } 
      if (val < 1000) { 
        return convert_nnn(val.intValue()); 
      } 
      for (integer v = 0; v < denom.size(); v++) { 
        integer didx = v - 1; 
        integer dval = (integer)Math.pow(1000, v); 
        if (dval > val) { 
          integer mod = (integer)Math.pow(1000, didx); 
          integer l = (integer) val / mod; 
          integer r = (integer) val - (l * mod); 
          String ret = convert_nnn(l) + ' ' + denom[didx]; 
          if (r > 0) { 
           ret += ', ' + english_number(r); 
          } 
          return ret; 
        } 
     } 
     return 'Should never get here, bottomed out in english_number'; 
   } 
 }


This method not handles for decimal point, so we need to call this class methods twice (once with passing number prior to the decimal point and another one with after decimal point)to convert the currency to word with decimal part .

lets consider I have a currency field test_currency__c in test_ob__c object and i have entered 5678.43 as value for this field.
I want to convert this field value to word format as USD five thousand six hundred seventy eight and fourtyThree cents.


string enteredCurrency = string.valueof(testObj.test_currency__c );
integer decimalIndex= enteredCurrency.indexOf('.');
integer part1=integer.valueof(enteredCurrency.substring(0,decimalIndex));
integer part2=integer.valueof(enteredCurrency.substring(decimalIndex+1));
//Now call the method to convert to word format for number prior to the decimal point
string currencyPart1InWord =  NumberToWord.english_number(part1);
string currencyPart2InWord='';
string amountInWords;
if(part2>0){
       currencyPart2InWord=NumberToWord.english_number(part2);
}
string amountInWords='USD '+currencyPart1InWord;
if(currencyPart2InWord!=null && currencyPart2InWord!=''){
        amountInWords=amountInWords+' and '+ currencyPart2InWord +' cents';
}
amountInWords=amountInWords+' only*';


Now you can get output as USD five thousand six hundred seventy eight and fourtyThree cents.